DIY Backyard Revolution Solar System Review
The first experiments were done three years ago, but then because of the move everything had to be curtailed and sold out.
However, the new solar system was purchased it was decided to start over in the new location, taking into account the practice gained.
What’s that for?
I am sure that the question “why” will be the first in the comments, so I will answer it right away.
From an economic point of view, a solar panel in the backyard is profitable.
Although, ideally, you need the roof of your own house.
But from a technical and engineering point of view it is quite interesting in terms of studying new and modern technologies.
Also, we should not forget that modern apartments consume more and more energy, especially given the growing popularity of various “smart” devices, constantly connected routers, smart bulbs, smart sockets, smart pots and pans, and more.
Compensating these costs with solar energy is, in principle, not so bad and quite environmentally friendly. Well, and finally, to look at the electric meter and see on the screen “current consumption -100W” just nice.
What is Backyard Revolution?
Backyard Revolution is the new solar DIY project. The vertically stacked, three-dimensional solar array is truly innovative for the solar industry (no pun intended). The design itself is based on a study first published by Massachusetts Institute of Technology in 2012.
It’s a well-known fact that the conventional solar panels waste 85% to 95% of the energy they receive from the sun. That is, until now.
By stacking best solar Backyard Revolution panels on top of each other in an alternate zigzag pattern, we can highly increase the electrical output of the solar panel.
MIT said so themselves in their findings, and we have been able to PROVE it by building these “do-it-yourself solar generators” over and over again for ourselves and our friends.
And now, with Backyard Revolution we are ready to teach others how to build it themselves using common household tools, a couple of dollars in materials, and just a few hours of time.
General information
As you know, there are two basic principles of home solar power plants.
- Accumulation of energy in batteries
- Giving energy to the electricity grid
The first way implies a situation where there is a need for a truly autonomous power supply, i.e. either no electricity at all or it is supplied irregularly. In this case, the energy of solar panels is first stored in batteries, and then “normal” voltage is created through an inverter.
The advantage of having batteries is that the system can operate without external power. Alas, there are many more disadvantages than pluses.
- Batteries are expensive and their service life is limited to 2-3 years for lead batteries
- We need to think about how to switch consumers between the “main” and “solar” network
- Battery can be deeply discharged or recharged, both are bad for them
If the battery is fully charged, the panels are wasted and energy is wasted. Plus you have to think about balancing the battery cells, if there are more than one, and so on. However, in recent years there has been some progress, in particular, with the Tesla Powerwall – everything works “out of the box”, using lithium batteries and a 10-year warranty, but at a price of $ 6500, the payback of such a thing is in question.
The second way, and it is also the most effective, is to give electricity directly from solar panels to the electricity grid.
In this case, the panels are connected to a special grid-tie inverter, which not only converts the direct current from the panels into alternating current, but also synchronizes the phase with the power grid.
The electricity that is “plugged in” is consumed inside the apartment/house and the excess is fed into the city grid, so we not only extract electricity for ourselves, but also help our neighbors/city to relieve the general electricity supply. In the case of modern legislation and an electricity meter that can count “import” and “export”, we can even get some money, but it doesn’t work everywhere yet.
Minus the inverter has only one – in case of a power failure, the inverter will shut down, so even with a whole solar panel roof of 3-4KW, you can be without electricity if it suddenly goes missing.
But in my case, the shutdowns are so rare that they can be neglected, in extreme cases, now a huge selection of fairly efficient DC-DC converters that can be powered by laptop, smartphone and LED-lights, so if you want it can be done.
So, the general idea of what to do is clear, let’s get started.
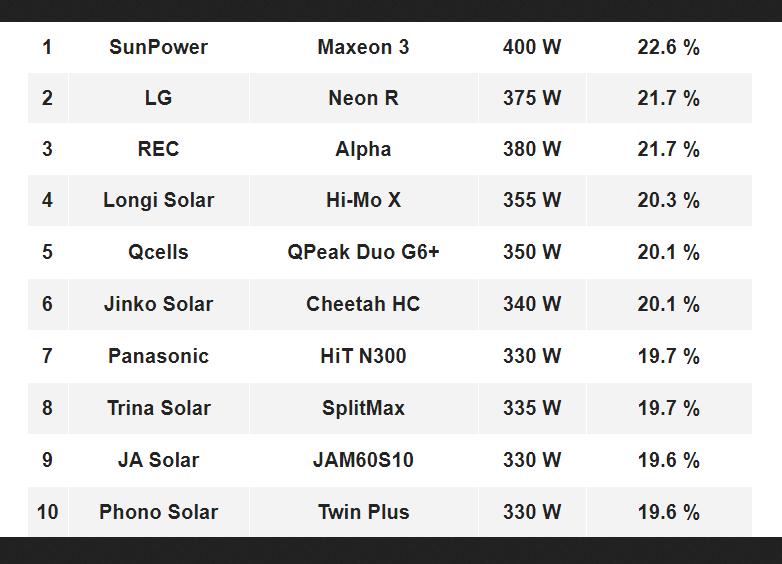
The first relevant question is the choice of panels. We read experts’ opinions that solar panels differ in efficiency, and we should take the most effective ones.
It is difficult to argue with this, but as the search showed the difference is 2-3%.
| Make | Model | Power | Efficiency | |
|---|---|---|---|---|
| 1 | SunPower | Maxeon 3 | 400 W | 22.6 % |
| 2 | LG | Neon R | 375 W | 21.7 % |
| 3 | REC | Alpha | 380 W | 21.7 % |
| 4 | Longi Solar | Hi-Mo 4 | 375 W | 20.6 % |
| 5 | Trina Solar | Honey M DEO8 | 375 W | 20.5 % |
| 6 | Solaria | Power XT | 370 W | 20.5 % |
| 7 | Jinko Solar | Tiger Pro 6Rl3 | 390 W | 20.4 % |
| 8 | Phono Solar | TwinPlus M4-9B-R | 375 W | 20.4 % |
| 9 | Canadian Solar | HiKU CS3L+ | 375 W | 20.3 % |
| 10 | Astronergy | AstroSemi 60M | 375 W | 20.3 % |
iformation in table from www.cleanenergyreviews.info
Anyway, I just scored on this point and chose those that were available in the local Amazon and had the best reviews.
It remains to select the power. In general, 160 W was the optimum value. The size of this panel is 150x70cm, and its weight is 12.5kg.
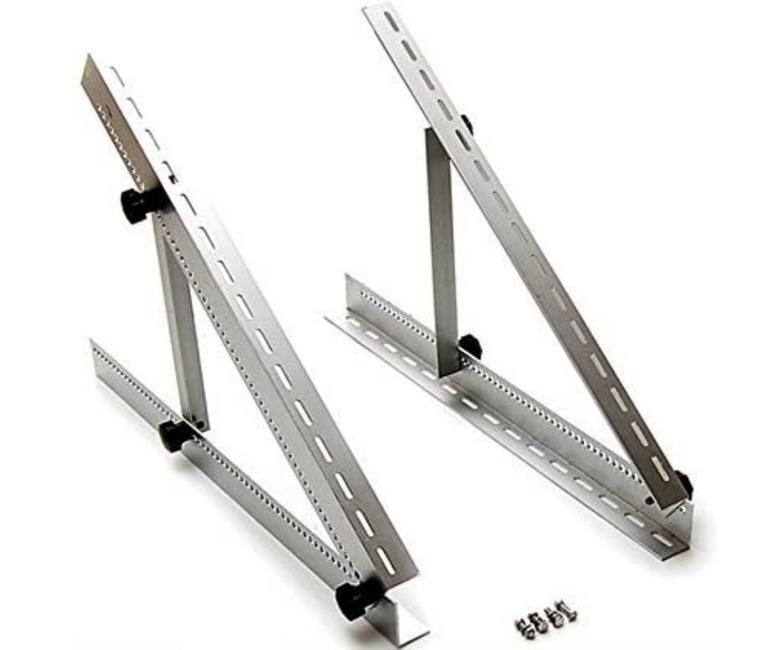
 Fasteners with adjustable tilt angle were also purchased for solar panels:
Grid-tie inverter
The choice of inverters for such micro-powers is not so great, from the basic models we can note such:
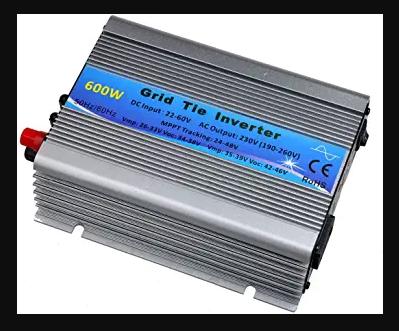
This is a fairly simple inverter of 100-120 usd price, there are models for different input voltage, 11-30V and 22-60V.
This inverter has a drawback – it makes periodic noise because there is a cooler inside. It only switches on during the day at a power level above 100W, there is no sun at night, but this is still worth keeping in mind if the inverter is standing in a living room.
Another option is the so-called “micro-inverter”, which is attached directly to the solar panel:
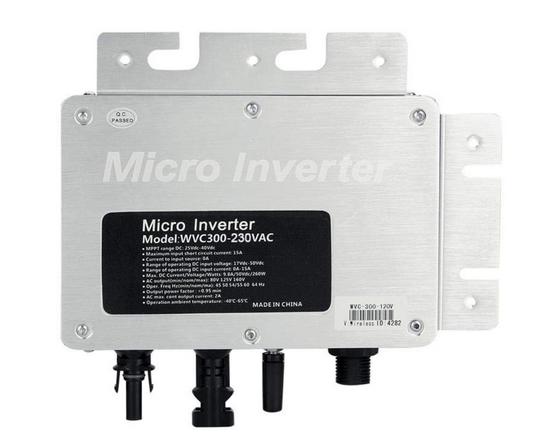 The method is quite effective and convenient. Solves the problem of noise, plus due to the higher voltage less wire losses.
Data Gathering
Basically, our system is ready – just connect the panels to the inverter, plug it into a regular socket, and everything will work.
However, it would be desirable to see, at least, how much power is given from the panels, and, at maximum, to have more advanced logging of the received energy.
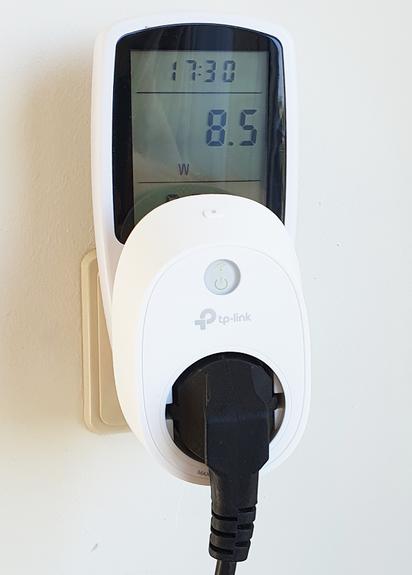
For starters, we need a power meter that displays the current reading on the screen.
It can output basic parameters (power, voltage, current, sum of kilowatt-hours), but it has no “network” functions, as well as no data storage capability.
The amount of kilowatt hours is useful when it comes to an iron or fridge, but for solar panels it is important to see the production during the day.
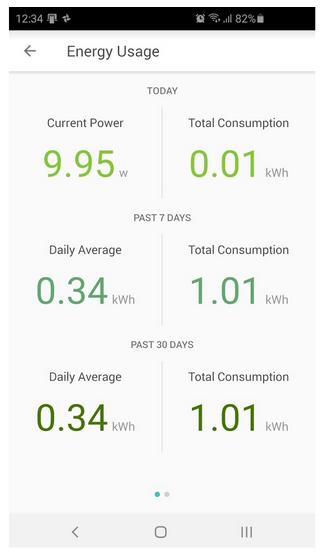
The search showed that the best functionality is provided by the TP-Link Kasa HS110 smart socket – it can not only display power data, but also has a Python API that allows you to get current data.
It is important not to confuse with the HS100 model, there is no power measurement in it. By the way, as a bonus, software from TP-Link has its own “cloud”, and you can see the generation values online from anywhere in the world:
 Unfortunately, none of the smart sockets have their own LCD screen.
As a result, we got such a “sandwich” – the first “not smart” socket shows the generation values on the screen, the second “smart” but without the screen, provides WiFi connection.
 However, there is no built-in logging in the TP-Link application, so I had to finish it myself.
https://github.com/python-kasa/python-kasa library was used for this purpose.
The log recording code is very simple:
from kasa import Discover, SmartPlug, SmartDevice
import datetime, logging, time, asyncio

log_format = "solarlog-%Y-%m.csv"

def get_power_from_meter() -> float:
    try:
        logging.debug("Connecting the smart plug...")
        devices = asyncio.run(Discover.discover())
        for addr, dev in devices.items():
            if dev.is_plug:
                asyncio.run(dev.update())
                if dev.has_emeter:
                    logging.debug("Smart Plug found: %s", addr)
                    emeter_status = asyncio.run(dev.get_emeter_realtime())
                    power = emeter_status['power']
                    return float(power)
        logging.debug("Smart Plug was not found")
    except Exception as e:
        logging.error("get_power_from_meter exception: %s", e)
    return -1.0

def write_log(power: float):
    log_name = datetime.datetime.now().strftime(log_format)
    with open(log_name, "a") as logfile:
        logfile.write(f'{datetime.datetime.now().isoformat()},{power}\n')

if __name__ == "__main__":
    logging.basicConfig(level=logging.DEBUG, format='[%(asctime)-15s] %(message)s')

    logging.debug("App started")

    # Read meter and save to the log
    try:
        while True:
            power = get_power_from_meter()
            logging.debug("Power reading: %f W", power)
            write_log(power)

            time.sleep(60.0)
    except KeyboardInterrupt:
        pass

    logging.debug("App done")
At work of the program csv-files of a log with a step approximately in minute and breakdown by months will be created.
I started collecting the log on my router with dd-wrt, which is enough command nohup python3 /opt/solar.py >/dev/null 2>&1 &. If you want, you can add a script to the autostart so that you don’t have to enter the command every time you turn on the router.
Results: Does Backyard Revolution really work?
It is quite difficult to guess with the weather to make the day either completely clear or quite cloudy. When it is, I will add screenshots to the text. So far, from the freshest data, power generation looks like this:
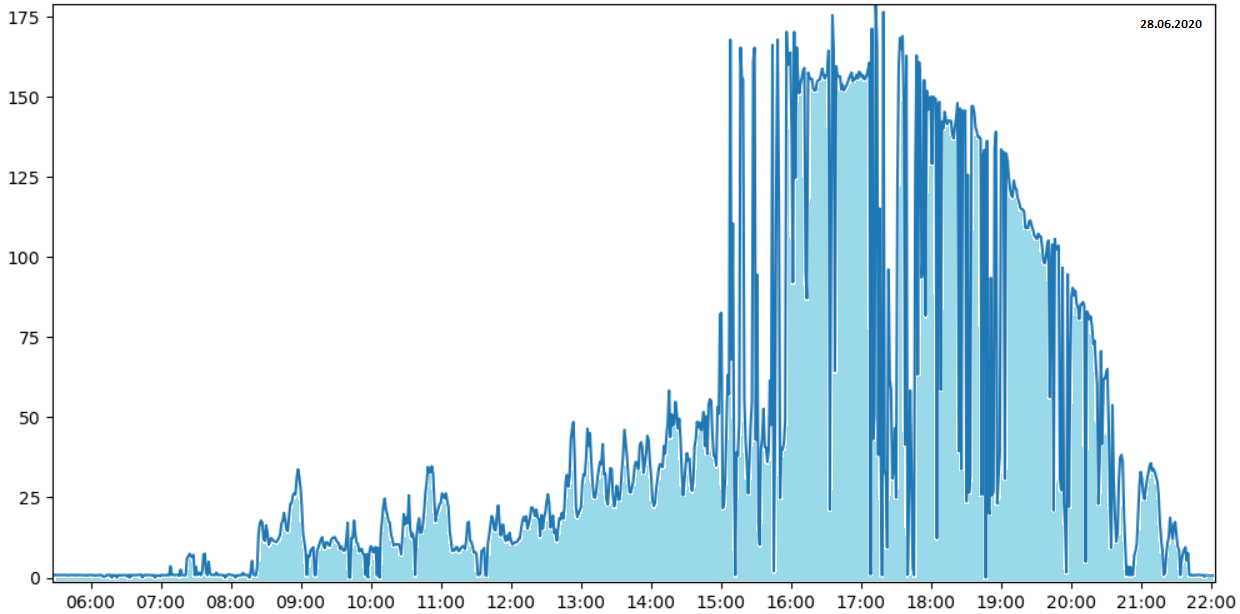
In my case, the panels are in the shade in the morning, and full production starts in the afternoon.
Although already at 9 am the mains power supply is up to 25W, which is generally good. As you can see from the schedule, the peak power was about 175W, and the “failures” on the diagram are also clearly visible because of clouds that sometimes come in.
The generation finishes after 21 hours – in summer the light day is long.
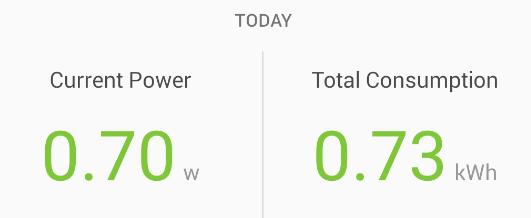
In all that day, 0.73KWh of electricity was generated:
Pros:
If there were no clouds at all, we could probably count on an increase of 20-30%, i.e. we would get exactly 1kWh/day.
By the way, the panels also work in cloudy weather, but the output is certainly less, and only with very dark thunderclouds, can fall to zero.
For comparison, this is how the generation looks like on a cloudy rainy day, the whole day was generated 0.21 kWh:
 Is it much or little? According to Google, 0.2kWh is enough to boil 2l of water with an electric kettle, which is not so bad for energy “from the sky” in theory.
Cons:
We can note that the efficiency is not as high as we would like it to be. Alas, manufacturers write on the panels the maximum power value obtained at right angles of sunlight and crystal clear air in the Himalayas.
In real life, the Sun is constantly moving through the sky, and the optimal angle of incidence will last no more than 1-2 hours a day. Of course there is nothing wrong with this, but you just have to take into account that, for example, real 100W from a 100-watt solar panel will almost never be produced.
Export of energy to the grid
Finally, we have come to the issue of exporting energy to the grid. It’s simple from a technical point of view, but it’s complicated from an economic point of view.
Technically, we just add a new source of energy to our household. Which will be consumed by the connected devices, and the surplus will go to the city grid through an electric meter (it is important).
The meter is important here because it is the meter that will determine how the exported energy will be counted.
A modern digital meter that can read both electricity exports and imports will display individual values for all parameters. There are a total of 4 different readings on this meter: import day, import night, export day, export night.
Of course, this is not so critical for a 100-200W station, most of the electricity is likely to be consumed inside the apartment with a refrigerator and other devices.
So even if someone doesn’t have a modern electric meter, it’s easier to consider it just as a charitable contribution to the environment – even if you “give” the city a few kWh.
Of course, if there are really a lot of panels, it is advisable to install a special grid-tie inverter with a so-called limit – current sensor, which is placed immediately after the electric meter and limits the output of the inverter so that nothing is emitted outside.
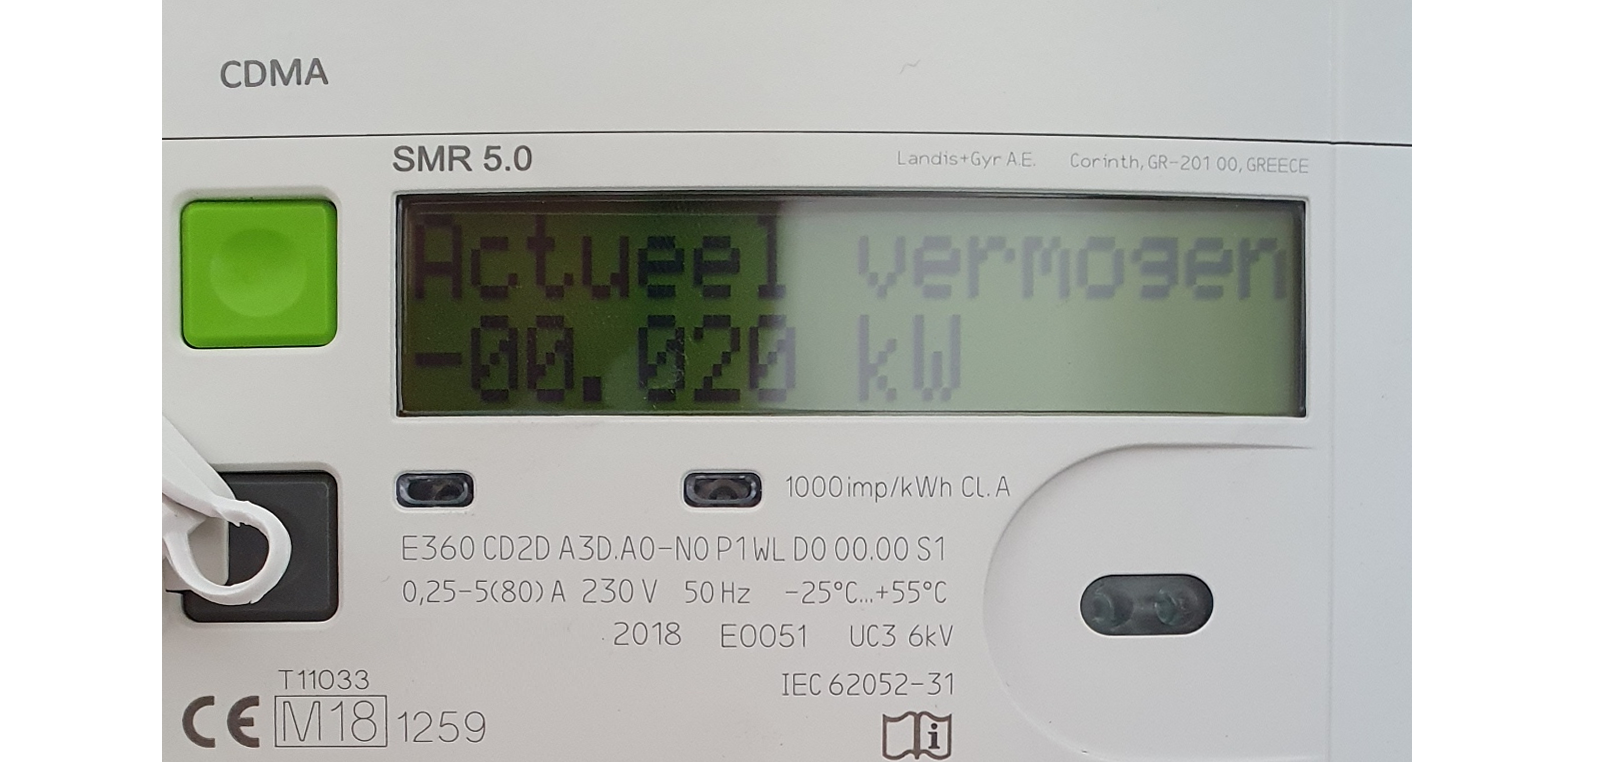
In my case, a modern meter has already been installed free of charge by the municipality, so that on a sunny day you can really see negative values of electricity consumption on the screen:
Conclusion
Getting solar energy is quite an interesting hobby project, in terms of joining something new. After all, as you know, the best way to learn a new technology is to try it yourself.
You can read other people’s articles as much as you want, but you can see with your own eyes the results of the work, the impact of the angle of the panels, invent protection from the wind, collecting statistics, and so on – it is much more interesting and gives much more experience and understanding of various subtleties.
To everyone who wants to repeat something like this on their own, I wish them successful experiments and more sunny days.
Author: Python/IoT developer


